This article lays out the exact steps in tooth implant in Turlock, CA so you know what to expect from start to finish. Dental implants replace missing teeth with a titanium post and a crown or denture. Read on for a clear timeline of the steps in tooth implant, who should consider them, and practical next steps to prepare for your appointment.
Step-by-step: The steps in tooth implant procedure
Initial consultation and medical review
The first visit is an exam and health review. Your dentist will check your mouth, review your medical history, and take X-rays or 3D scans. Expect questions about medications, past dental problems, smoking, and any chronic illnesses. Basic tests may include bite checks, periodontal (gum) assessment, and simple photos.
3D imaging & precise treatment planning
CBCT (cone beam) scans and digital mouth scans map your jawbone, nerves, and sinuses. This imaging lets the team plan exact implant positions and avoid sensitive areas. Precise planning reduces surprises during surgery and improves long-term success.
Creating your personalized plan and discussing costs
Plans vary: single-tooth, multiple teeth, or full-arch solutions like All-on-X. Your dentist will explain options, timelines, and likely costs. Financing, insurance, and informed consent are reviewed so you understand risks, benefits, and payment choices before moving forward.
Step 1 — Pre-surgery preparation
Extractions, bone grafts, or sinus lifts if needed
Some patients need tooth extractions or bone grafts before implants. Grafts build up jawbone if it’s thin. Sinus lifts raise the sinus floor for upper back implants. Healing times vary: extractions often heal in a few weeks, grafts can take 3–6 months before implant placement.
Medical prep and sedation options
Your dentist will review medications and may prescribe antibiotics or mouth rinses. Fasting rules depend on sedation. Sedation options range from local anesthesia to IV sedation for comfort during longer or complex surgeries.
Step 2 — Implant placement surgery
What happens during the procedure
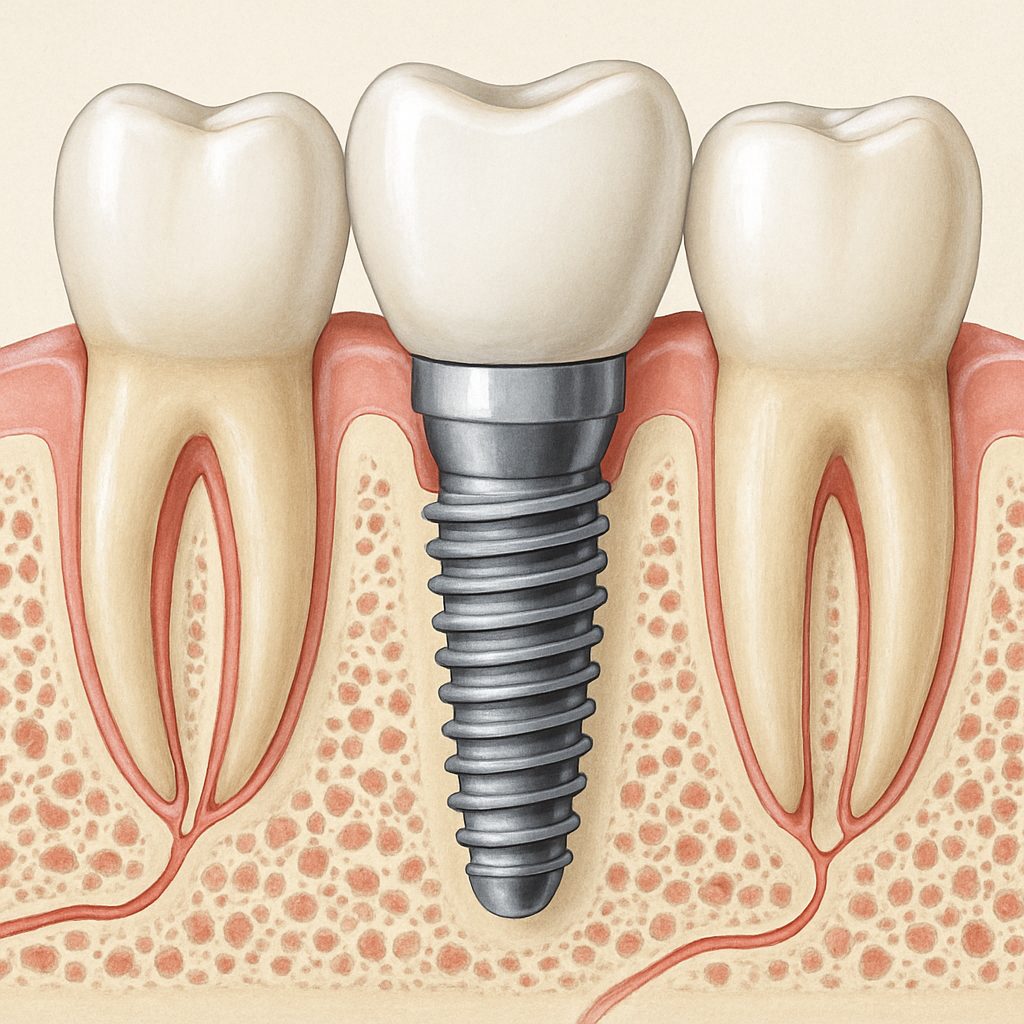
On surgery day the area is numbed or sedated. The dentist makes a small incision, drills into the jawbone, and places the titanium implant. The site is closed with stitches or a small cover. Most implant placements take 30–90 minutes depending on how many implants are placed.
Immediate vs. delayed loading
Some patients receive temporary teeth the same day (same-day teeth or All-on-X). Others wait for the implant to heal before attaching a crown. Immediate loading offers faster function and appearance, but it depends on bone quality and implant stability.
Step 3 — Healing and osseointegration
After surgery the implant fuses with bone in a process called osseointegration. This usually takes 3–6 months. You’ll have follow-up visits to check healing. Signs of proper integration include steady comfort, lack of movement, and healthy gums around the site.
At home, follow cleaning instructions, eat soft foods for a few days, avoid smoking, and limit strenuous activity for a week. Report persistent swelling, severe pain, fever, or unusual drainage right away.
Step 4 — Abutment and final restoration
Abutment placement and impressions
Once the implant is solid, a small connector called an abutment is attached. This may be a minor procedure that exposes the implant and places the abutment. Digital scans or traditional impressions capture the shape of your mouth for the final tooth.
Placing the final crown, bridge, or denture
The final restoration is fitted, adjusted for bite and appearance, and then secured to the abutment. Expect a few tweaks to ensure comfort and function. After placement, normal chewing returns over days to weeks as you get used to the new tooth or teeth.
Common risks, signs to watch for, and when to call the office
Complications are uncommon but possible. Watch for:
- Increasing pain, swelling, or redness (possible infection)
- Loose implant or crown
- Persistent numbness or sharp nerve pain
- Fever or drainage from the site
If you notice these, contact your dental office promptly. Many issues can be treated quickly with antibiotics, adjustments, or minor revisions.
Aftercare: Maintenance for long-term success
Good home care and regular dental visits keep implants lasting for decades. Brush twice daily, floss around implants, and use interdental brushes if recommended. Avoid heavy smoking and limit hard foods that can damage restorations. Schedule routine cleanings and exams every 3–6 months as advised.
How to choose a skilled implant provider
Ask about training, years of implant experience, and the technologies used. Good questions include:
- How many implant cases have you placed?
- Do you use 3D imaging and guided surgery?
- What are your success rates and follow-up care plans?
- Are same-day teeth or zygomatic options available when bone is limited?
Clear communication, detailed treatment plans, and transparent costs are signs of a reliable provider.
About Eggleston Dental Care and their implant capabilities
Eggleston Dental Care in Turlock, CA has over 30 years of experience led by Dr. Jim Eggleston. The practice offers All-on-X same-day teeth, 3D imaging, nano-ceramic temporaries, IV sedation, and zygomatic options for complex cases. Their team focuses on predictable outcomes, patient education, and flexible financing to make implant care accessible.
Scheduling a consultation
If you want a personalized timeline of the steps in tooth implant, book a consultation to review your mouth and treatment options. A tailored plan will show whether same-day teeth are possible or if staged treatment is safer for your health. Call Eggleston Dental Care to get started on your custom plan for the steps in tooth implant in Turlock, CA.